


The most interesting part of dealing with data in a database at least for me is neither the loading or gathering of the data but the extracting of useful information from it and perform authentication to allow users access to a web application. When I get to clean and query the database to extract information from it, I gain easy access to the piece together the story the data can tell us.
Most times you will be dealing with a database that has been loaded with data already or has an automated process for collecting data. So your major task might simply be to query the data to extract useful information. With that said let us begin to examine how we can extract data.
To make it easy for beginners who started out with the first tutorial on creating a database I will continue using that database with slight modification in the dataset to increase the number of rows using the query below.
INSERT INTO teachers_info(first_name,last_name,school,hire_date,salary)
VALUES
             ('Peter', 'Parker', 'LHS Middle School', '2021-01-20', 15500),
             ('Adekunle', 'Hassan', 'Premier High School', '2020-08-15', 20000),
             ('Iyinoluwa', 'Kadri', 'Baptist Middle School', '2021-01-20', 43000);

That done let us get started with querying this database. Firstly as a little reminder we will query all the rows in the database using the * symbol like this:
SELECT * FROM teachers_info;
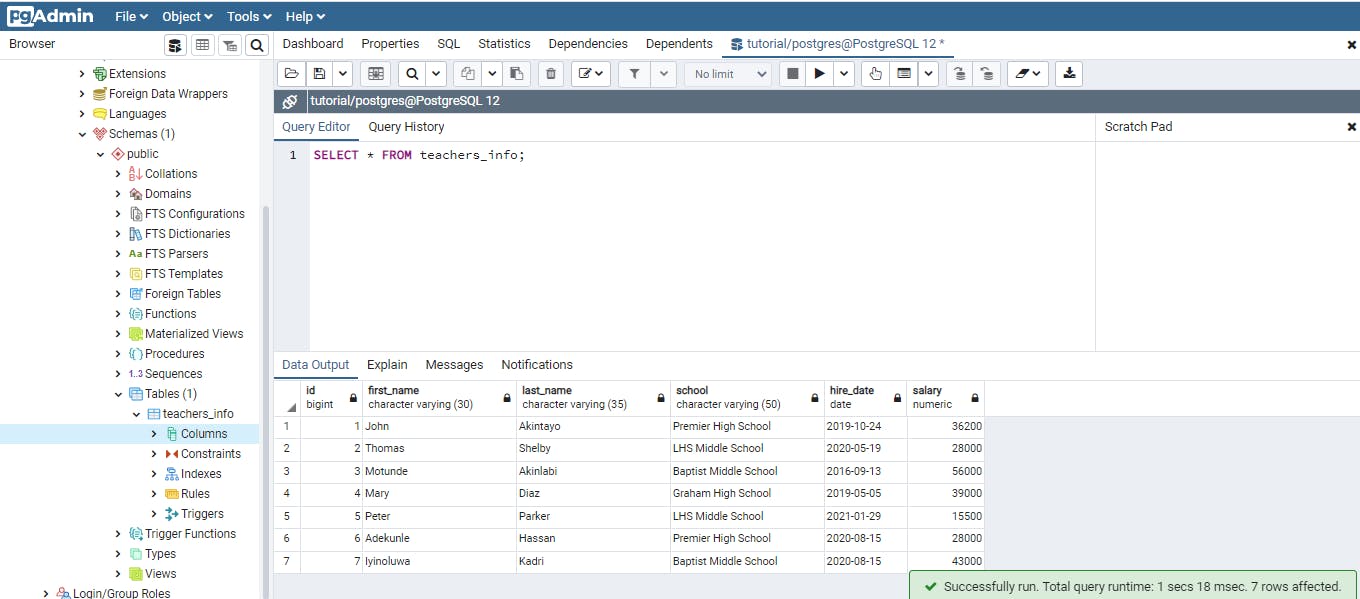
The symbol here is a wildcard which is a stand in for a value, it doesn’t represent a particular value but instead it represent everything that value can possibly be. The symbol here is saying “select all columns”. The FROM keyword indicates the particular table you want to query in the database. The result of the query above contains all the rows and columns that was inserted into the table. One thing I will like to point out here is the id column of type bigserial which during the insertion of the rows, we did not explicitly insert but automatically got populated with sequential integers. An advantage of this auto–incrementing integer is that it provides each row in the table with a unique identifier.
##Querying a subset of columns. The wildcard symbol with the select statement gives us an overview of the contents of the table. But most use cases, that are more practical will have you limiting the columns that are returned by the query most especially, if you are dealing with a large database. To return a subset of columns we list the name of the columns separated by commas, right after the SELECT keyword. Lets retrieve just the first_name last_name and the school from the teachers_info table.
SELECT last_name, school, first_name
FROM teachers_info
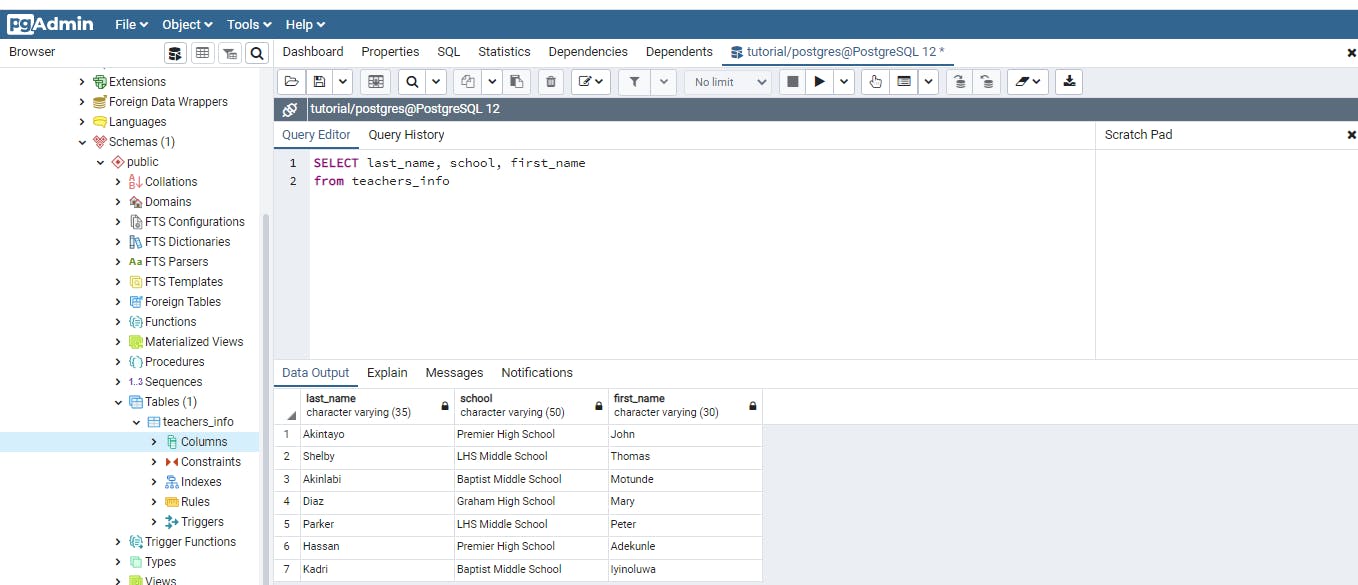
Something interesting of note here is that you can retrieve the columns in any order not necessarily the way it was created in the table. As we can see the last_name column comes before the first_name column in our query above.
Using Distinct to retrieve Unique values.
When dealing with data from a database it is very common to find columns containing duplicate values as we have in the SCHOOL column in the teachers_info table. The DISTINCT keyword helps to eliminate duplicates of a value in a column which helps to give an idea of the range of values we have in a column. Let’s see in this action.
SELECT DISTINCT school
FROM teachers_info;
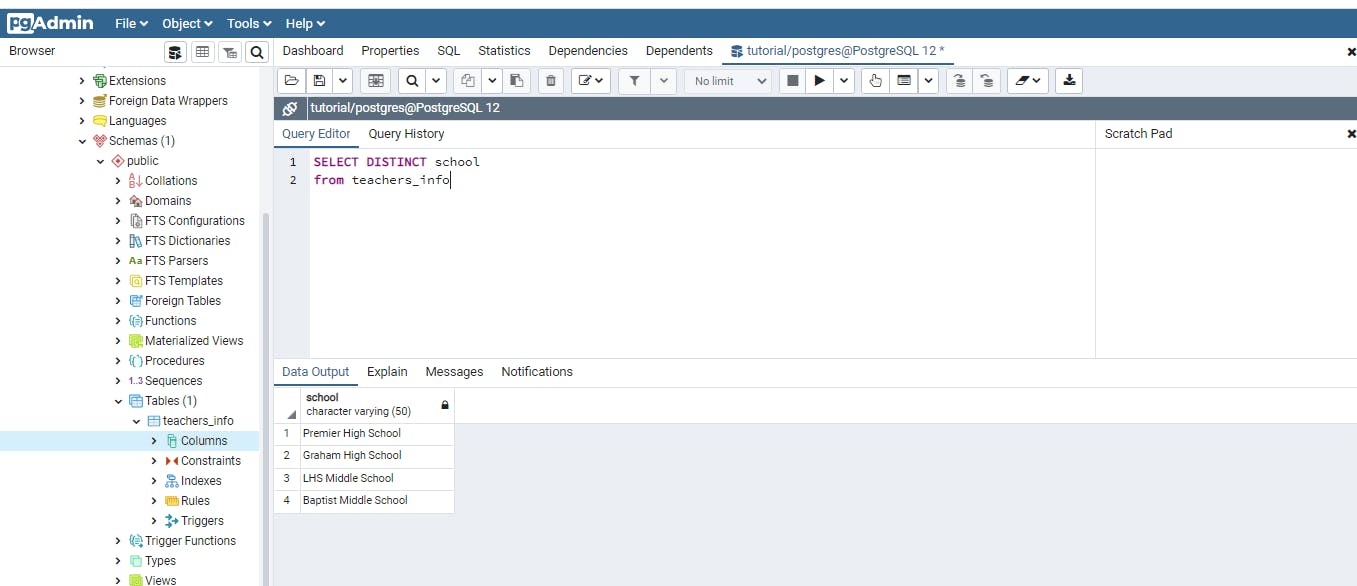
From the result above we get just the names of the schools in the table and this returns just 4 rows all with a unique value. Asides checking for unique values the DISTINCT keyword can help us identify variations of certain values that should be the same and thus enable easy corrections. The DISTINCT keyword can be used with more than one column and in this scenario it looks out for similar rows having the same values for each column and then returns only one row while dropping the duplicates
Sorting Data with ORDER BY
A quick eyeballing over our small dataset in this table will easily tell us the teacher with the highest salary but if we are dealing with a table with thousands of rows that will be so time consuming and practically impossible. Coming to our rescue is the ORDER BY keywords. This keyword has no effect on the original table but only the result of the query. The ORDER BY keyword helps to give order to our data and this helps reveal pattern more readily.
SELECT first_name, last_name, salary
FROM teachers_info
ORDER BY  salary DESC;
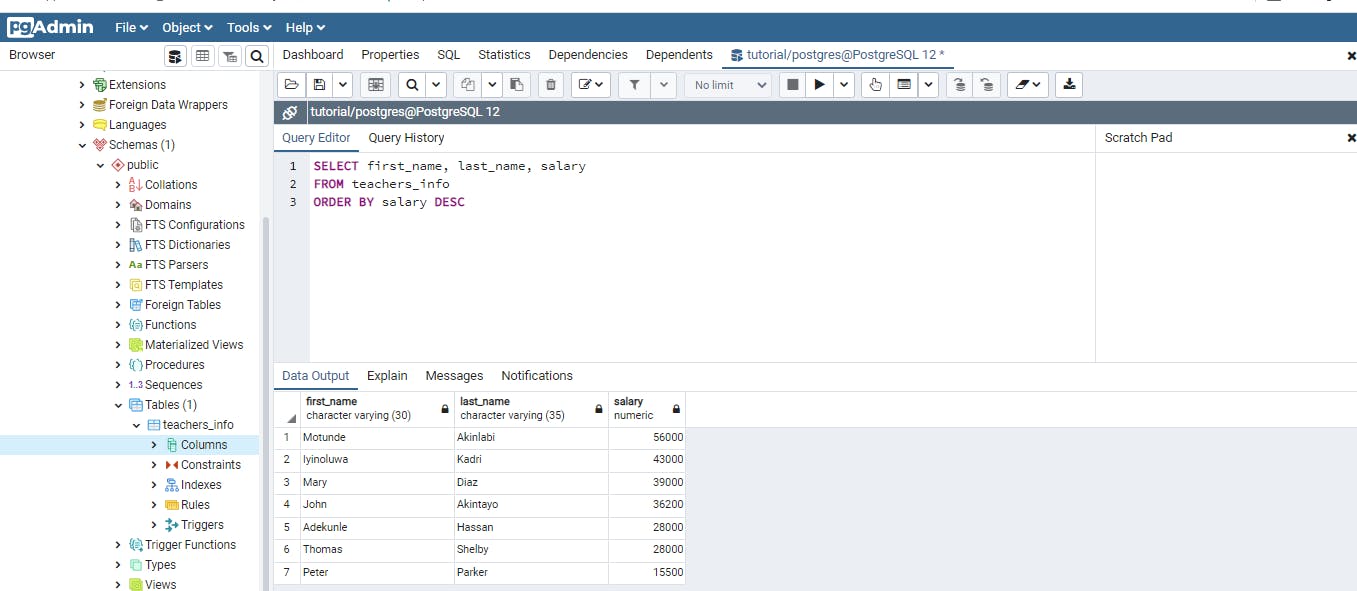
The above query sorts the salary from highest to lowest also given us the teacher who earns the highest. The optional DESC keyword tells the ORDER BY how to go about the sorting by default ORDER BY sorts from lowest to highest (i.e. ASC) Like most keywords, we can sort by more than one column and we will see this in the following example.
SELECT last_name, salary, school, hire_date
FROM teachers_info
ORDER BY school ASC, hire_date DESC
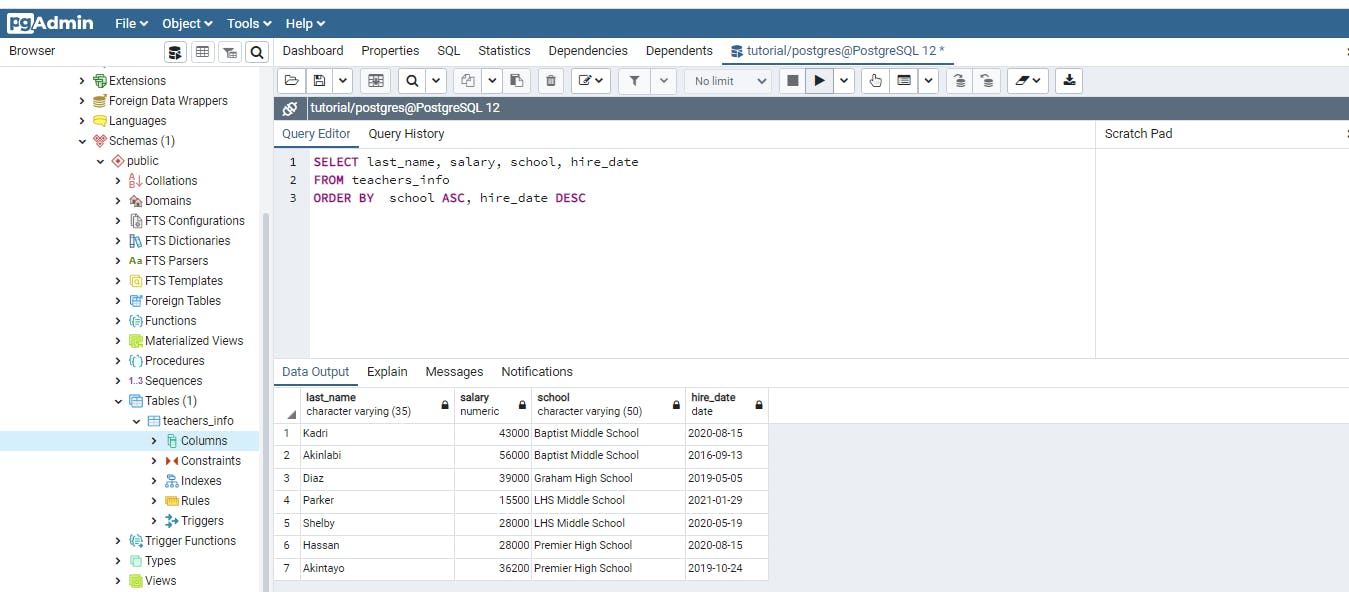
Let me explain the above query and the corresponding result the ORDER BY keyword firstly organizes the results by sorting the school column in an ascending order then for each school appearing more than once it looks for the hire dates corresponding to such school then sorts the hire data in a descending order that is from the newest hire to the oldest. At this point I will like to point out a slight draw back when using several columns with the ORDER BY keyword. A point of diminishing return will arise where it becomes difficult to understand the various sort directions and the output becomes hard to understand.
Using WHERE TO filter results.
More often than not, just like we might not want to return the entire column, we will want the returned rows to have met a certain criteria. Using our example we might want to query the database to return teachers who earn more than 25,000 or who were hired between a particular timeframe. Let us get started with a simple example. We want to find out the names of teachers employed by a particular school.
SELECT last_name, salary, school, hire_date
FROM teachers_info
WHERE school = 'LHS Middle School'
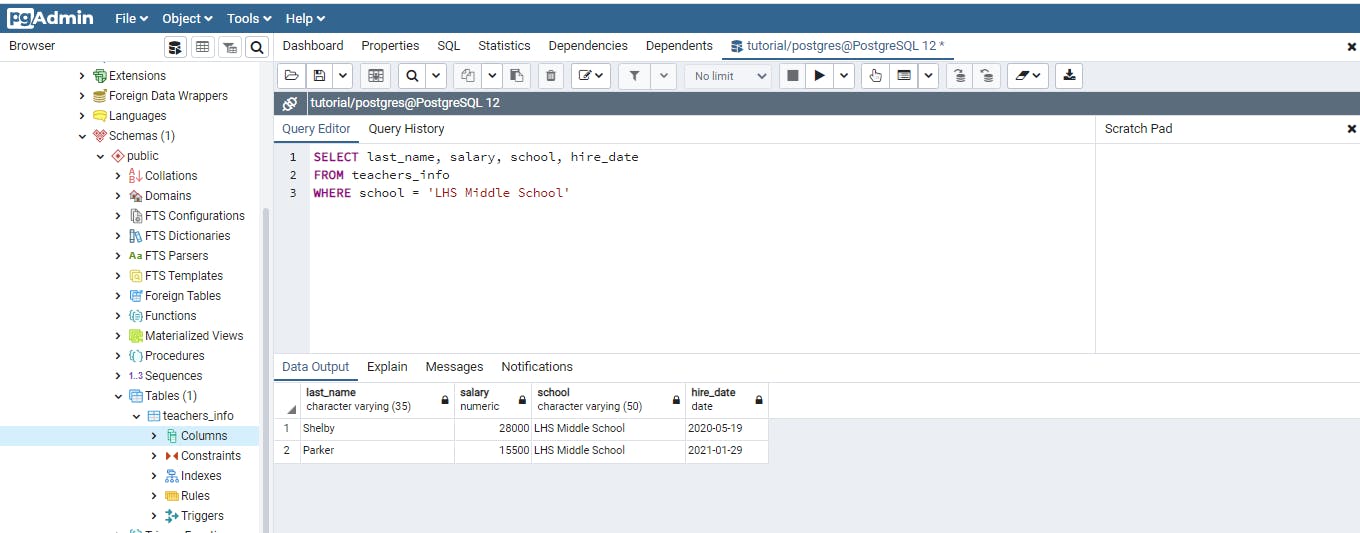
The query above wanted only rows that satisfied the WHERE criteria i.e. where the school equals ‘LHS Middle School’.
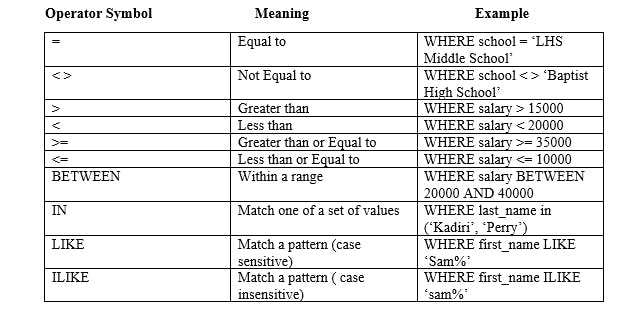
If you program in other languages you will be familiar with operators, I made use of the equals comparison operator in the above query. Other operators can be used either alone or in combination with the WHERE keyword as will be shown in other examples.
I will attach an image of a table below that contains information on operators and how they can be used with the WHERE keyword.
Using other comparison operators with the WHERE keyword.
SELECT last_name, salary, school, hire_date
FROM teachers_info
WHERE school <> 'LHS Middle School'
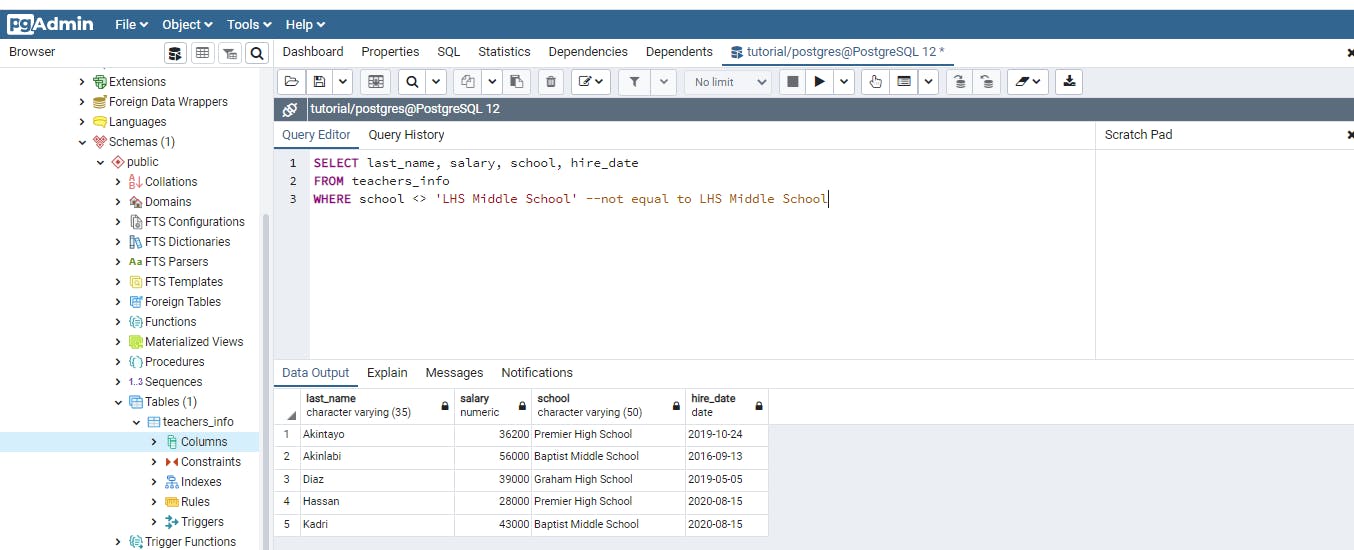
The above query searches for rows where the school column does not include ‘LHS Middle School’
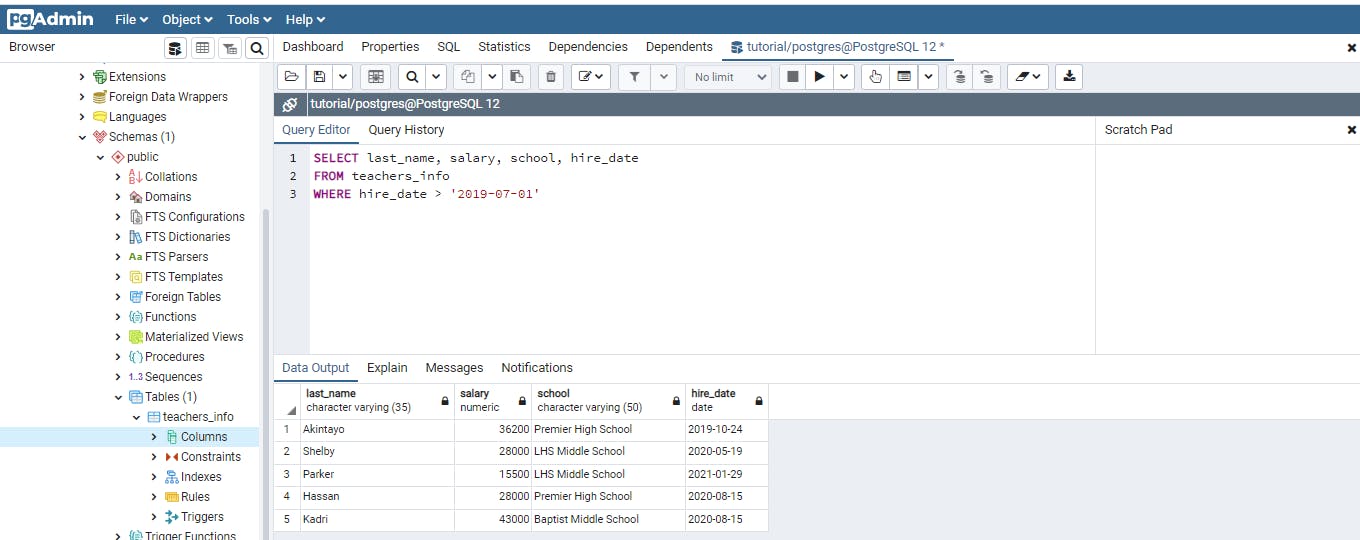
The following query will search for teachers hired after ‘2019-07-01. Note, I am using the standard “YYYY-MM-DD” format.
SELECT last_name, salary, school, hire_date
FROM teachers_info
WHERE hire_date > '2019-07-01'
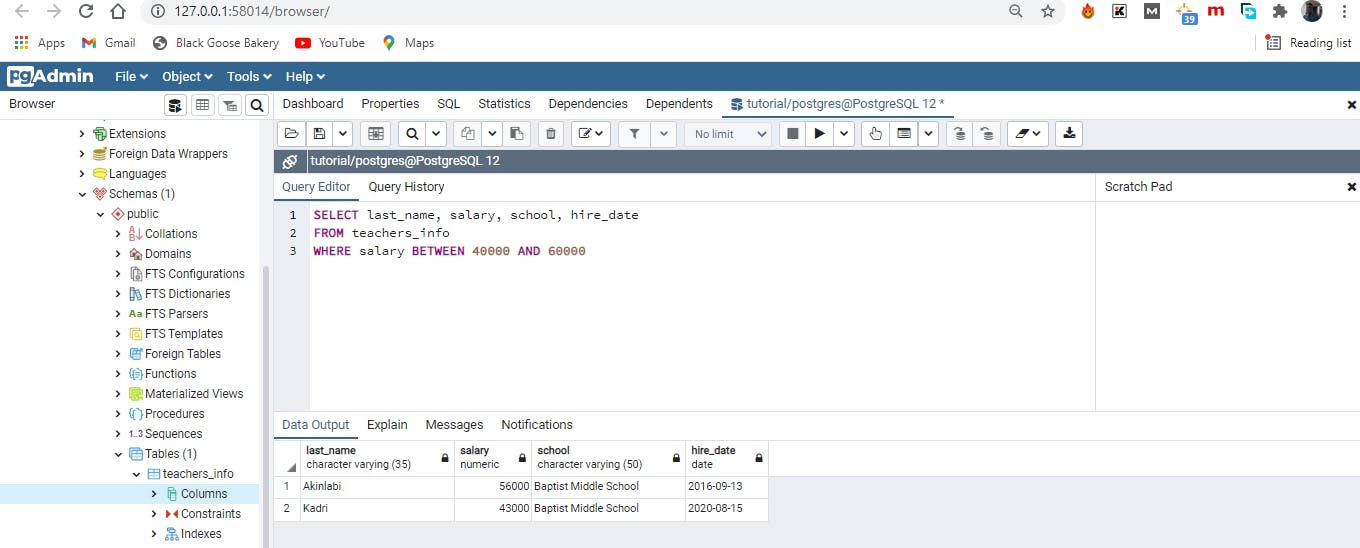
Let's take a look at another example where we use the BETWEEN operator to query for teachers who earn between a particular salary range.
SELECT last_name, salary, school, hire_date
FROM teachers_info
WHERE salary BETWEEN 48000 AND 6000
Using comparison operators are quite straightforward but using the LIKE and ILIKE comparison operators require a little bit of explanation. Using either LIKE OR ILIKE, we can search for patterns in strings using two special characters:
Percent Sign (%): Which in this case is a wildcard matching one or more character. Underscore (_): A wildcard matching just one character. Two major differences between the ILIKE and LIKE is that the former is case insensitive and just a PostgreSQL-only implementation while the latter is part of the ANSI SQL- standard and case sensitive.
The following example will help illustrate the differences.
SELECT first_name, last_name, salary, school, hire_date
FROM teachers_info
WHERE first_name LIKE 'M%'
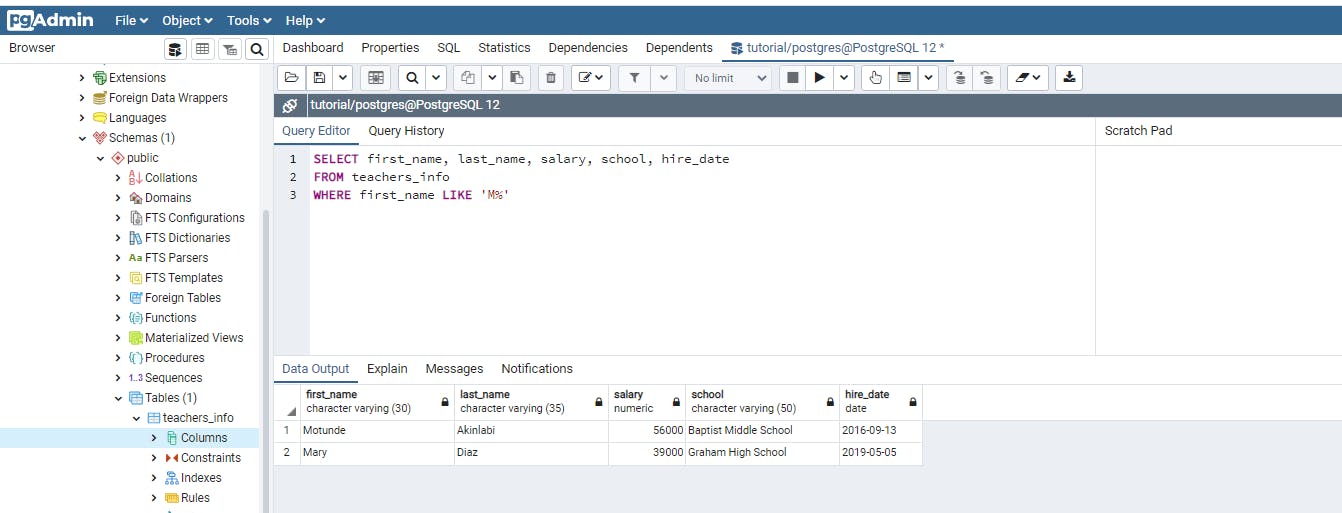
The first query uses the LIKE with an uppercase “ M” and two rows were returned but using a lowercase “m” no row was returned because there is no first_name in the table that begins with a lowercase “m” and LIKE is case sensitive.
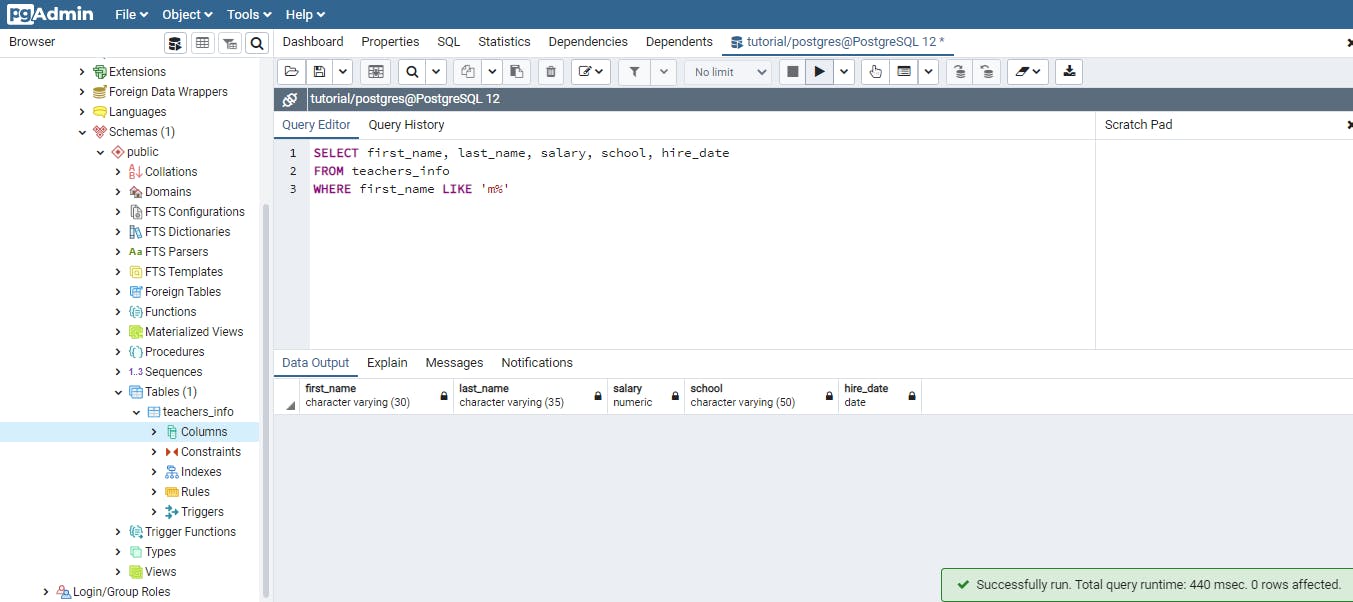
Let us try a lowercase “m” with ILIKE and see the result.
SELECT first_name, last_name, salary, school, hire_date
FROM teachers_info
WHERE first_name LIKE 'm%'
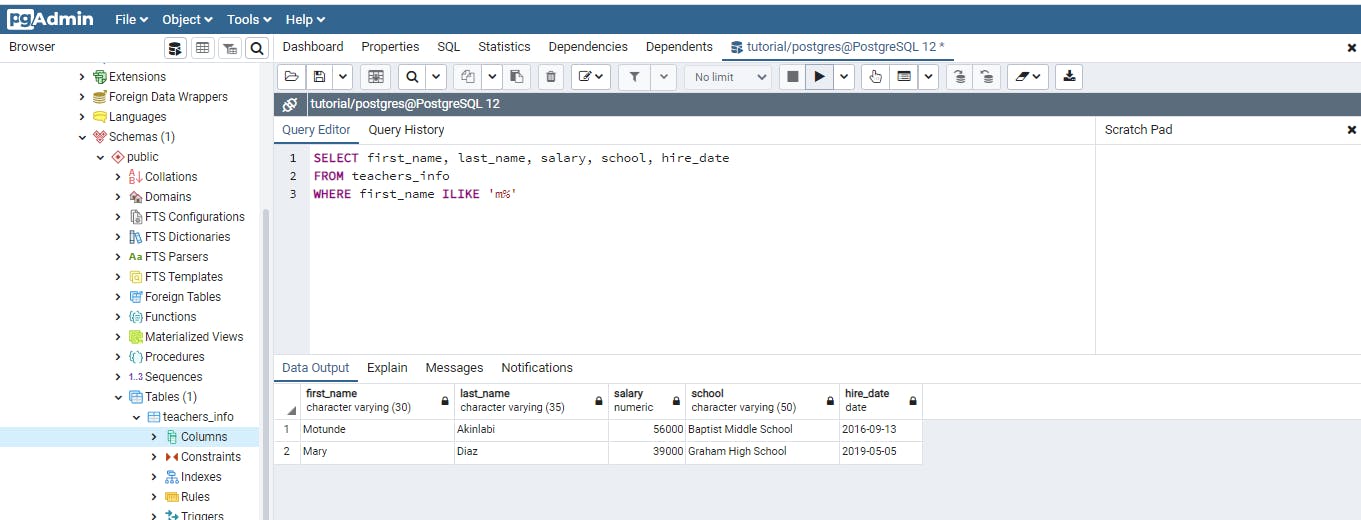
Ta-da!!! it returns two rows as the ILIKE is case insensitive.
The next set of examples will deal with combining operators with the WHERE keyword to further filter our results.
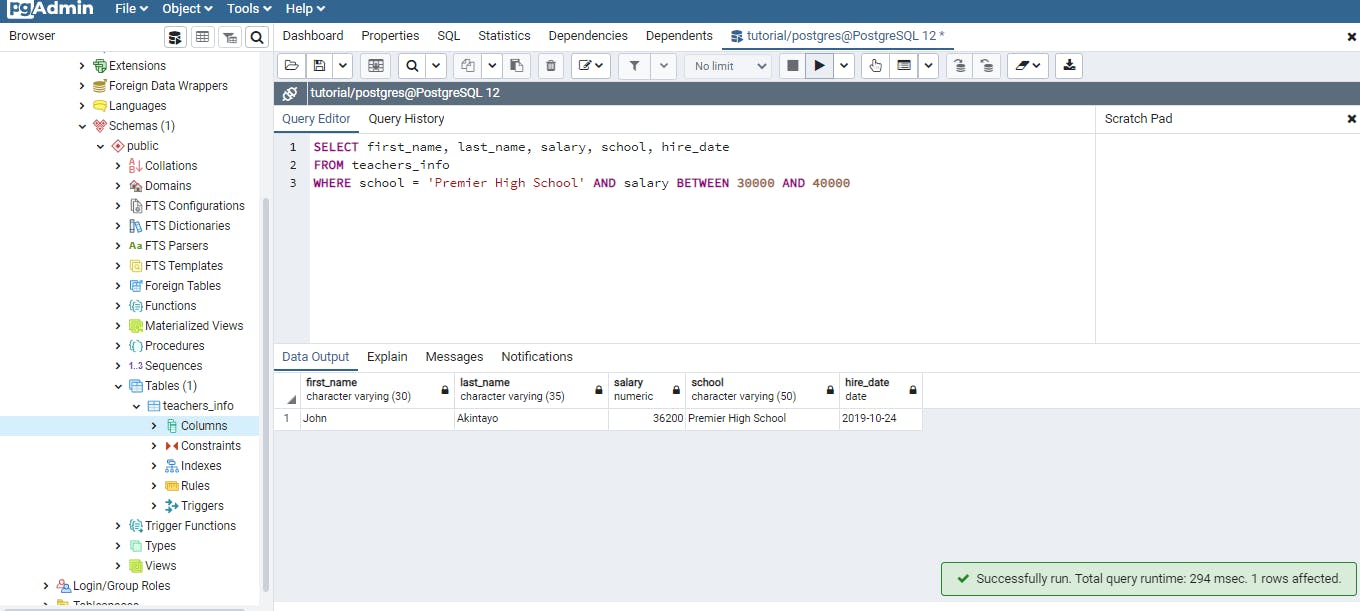
SELECT first_name, last_name, salary, school, hire_date
FROM teachers_info
WHERE school = 'Premier High School' AND salary BETWEEN 30000 AND 40000
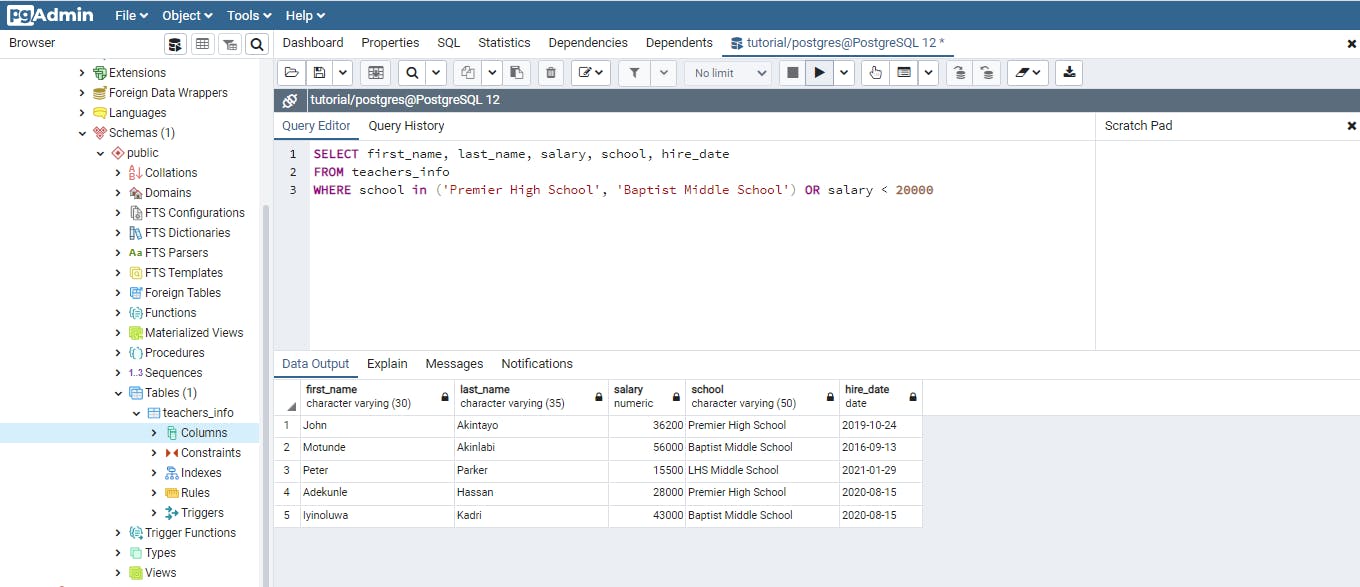
SELECT first_name, last_name, salary, school, hire_date
FROM teachers_info
WHERE school in ('Premier High School', 'Baptist Middle School ') OR salary < 20000
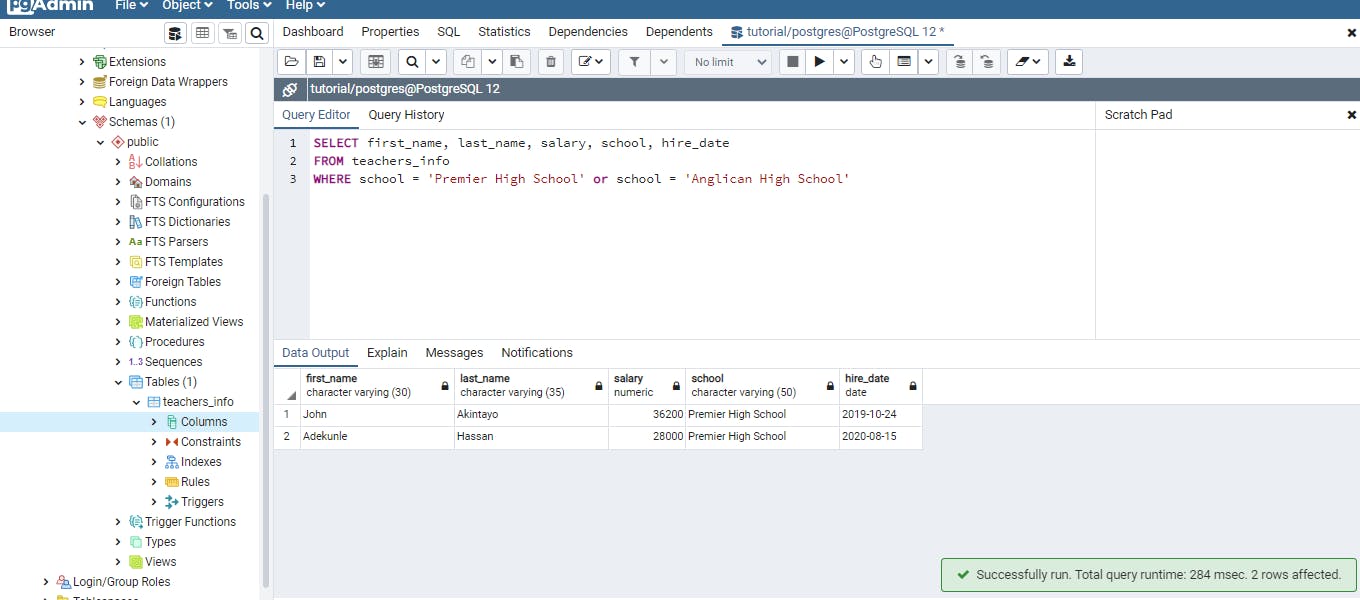
SELECT first_name, last_name, salary, school, hire_date
FROM teachers_info
WHERE school = ' Premier High School' or school = 'Anglican High School'
SELECT first_name, last_name, salary, school, hire_date
FROM teachers_info
WHERE school = ' Premier High School' AND school = 'Anglican High School'
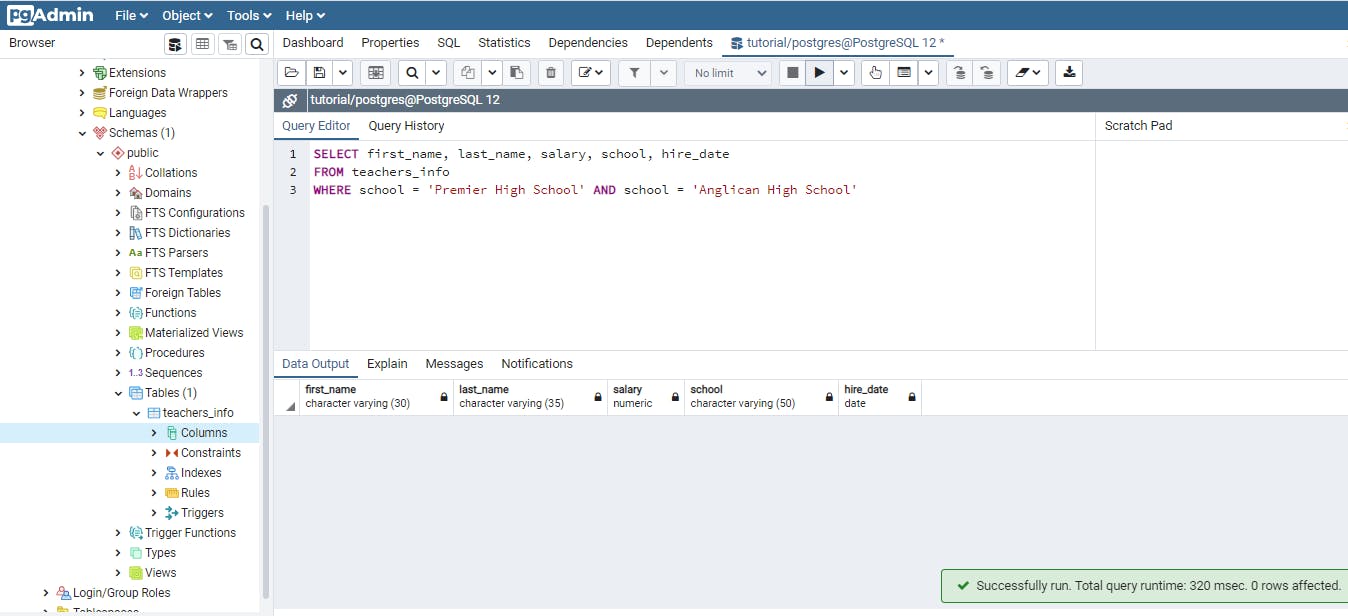
In the last two examples I made use of a school name that wasn’t in the table however with the OR keyword, two rows are still returned. This is because using the OR keyword only one of the criteria needs to be satisfied unlike the AND keyword where both criteria must be met unless no result will be returned.
This brings us to the end of this blog post. Thank you for you reading. I will appreciate your feedbacks and if you do find this post helpful kindly share. Thank you.